
This article will take you through the process of adding a property, tenant, and rental agreement. Then, applying for pre-authorized debit and finally setting up your first monthly rent payment.
Step 1: Create a Property
On the left navigation, click on Properties / Manage.
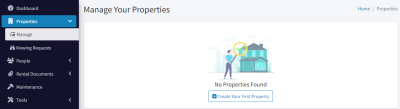
Then click Create Your First Property. The property dialog will open.
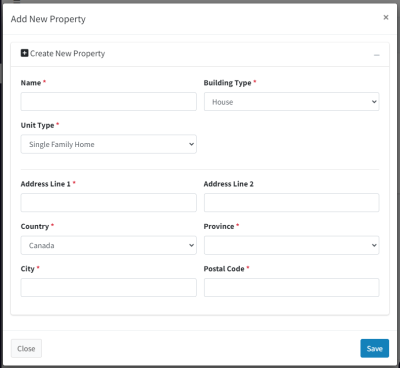
Give your property a name, choose a building type, then unit type.
- If your property is a multi-unit building and you own the entire building, choose multi-unit for the property type, then add the units as a comma delimited list (e.g. “101, 102, 103, …”).
- If you own a single condo in a building, choose Single Family Home and make sure to add the Address Line 2 for the unit number.
- If you own a house that is not a multi-unit building, typically that just has a value for Address Line 1.
Then, add the address and click Save. At this point, you have added a property.

Step 2: Adding a Tenant
On the left navigation, click on People / Tenants.

Then click Create Your First Tenant. The tenant dialog will open.

Add their first and last name.
If you choose Create Account for Tenant, then you’ll have to enter their email address as well. An account is recommended as it allows the tenant to manage banking information and view upcoming payments, submit maintenance requests, and review rental agreement documentation.
If you create an account for the tenant, you may also enable SMS notifications for them. More information on that topic can be found here.
Click the Save button.
At this point, a tenant has been created, and an email has been sent to them to confirm their email address and create an account on the system. They may confirm or decline this invitation if they wish. Once they have confirmed their email address, their status will change to Connected.

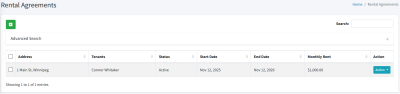
Step 3: Creating a Rental Agreement
On the left navigation, click on Rental Documents / Rental Agreements.
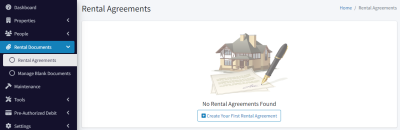
Click on Create Your First Rental Agreement. The rental agreement dialog will open.
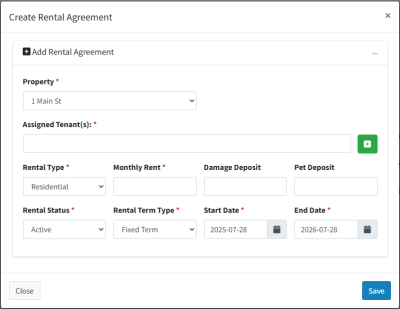
Select the property you created. If that was a multi-unit property, another drop-down list will enable you to choose the unit.
Assign the tenant, set the rental type (residential or commercial), add in the monthly rent, then set the start / end dates of the lease. You can choose Month-to-Month for rental type if you need.
Click Save.
Step 4: Register for PAD
To be able to set up rent payments to be processed through our system, you’ll need to register for pre-authorized debit (PAD).
Start by clicking on the Pre-Authorized Debit / Register for PAD menu item on the left navigation.

Then click Start Approval Process. This step requires a payment method, so you will be prompted to add one, if you haven’t already.
Next, you’ll select what kind of application this is. If you will be receiving funds to a personal bank account, choose the personal option. If you will be receiving funds to a business or corporate bank account, choose the business option.

You will be prompted to enter in some information. The personal application is shorter, with just name and address. Business applications have a few more fields, like the business name, operating name, and business number from the CRA.
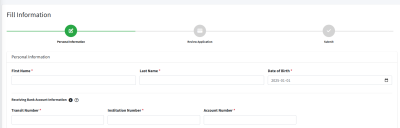
The receiving bank account information will be the details for a bank account where you will be receiving funds. We can set up additional bank accounts later.
Below is the address information for you or your business, depending on which application you chose.
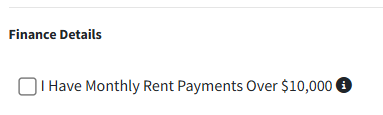
Then, we have a simple checkbox that must be checked if any of the expected rent payments are greater than the displayed amount. Please note that this is referring to any individual payments, and not the total rent roll.
Click on Next Step.
If you chose a personal application, that is all of the information we’ll need. If you chose a business application, you will be prompted to enter in the address information for all owners of your company.
After that, you’ll see a summary of all the information you have entered. If anything doesn’t look right, use the Previous Step button to go back and make corrections.
Select that you agree to the terms and conditions, then click Confirm & Submit.

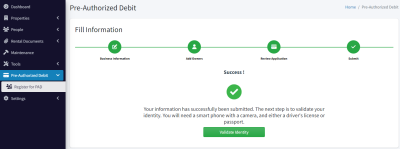
Step 5: Verifying your Identity
The next step is to validate your identity. This means providing some ID, and possibly documentation proving who you are. This is all part of our due diligence process to comply with Canadian regulation.
Click on the Validate Identity button.
You will be prompted to enter your phone number. An SMS message will be sent to you and will contain some further instructions. You’ll need some photo ID like a driver’s license or passport to complete this process.
You’ll need to submit a picture of your ID, plus a selfie.
Next, our team will review your application and will reach out if we need any additional information.
You will be notified by email when your application has been approved. In Canada, this generally takes 1 business day.
Step 6: Setting up Monthly Rent Payments
Once you have been approved for PAD, we can now configure the rent payment for the tenant we added earlier.
On the left navigation, go to Pre-Authorized Debit / Tenant Payments.
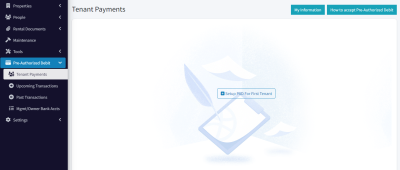
Click on Setup PAD for First Tenant
During this step, we are going to set up the tenant to make payments through our system. Select the desired tenant from the drop-down list.

You’ll notice that you now have 3 options.
- If you haven’t yet gotten documented permission for PAD payments from your tenant, you can do that though our system. Choose the top option and click the Send button. An email will be sent to the tenant which asks permission to withdraw rent payments, and they also fill in their banking information during this process.
- If you already have documentation that you have permission to withdraw PAD payments, choose the third option. At this point you can simply enter their banking information here. You’ll need to upload a PDF file which shows that you have permission to withdraw funds from their account.
- The middle option will email the tenant a standard PDF for giving PAD permission, and you can store that in the platform if you wish. This is just an easy way to get them the document to fill out if you prefer to have hard copies.
Regardless of which of the above options you choose, the tenant will now have given their permission for PAD and is set up to have payments withdrawn through our system.
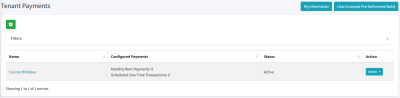
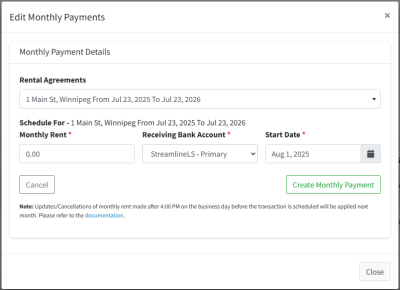
Click the Action button and select Monthly Rent.
Confirm the correct Rental Agreement is selected (usually you’ll only have one), then check the amount, select the desired receiving bank account, and confirm the start date.
Please note that the start date defaults to the 1st of the next available month. You may want to choose a different date. That is the date that transactions will be processed each month.
Click Create Monthly Payment.
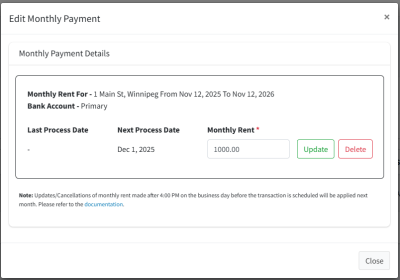
The monthly rent is now set up. If you need to update the amount, you would do it here, in this dialog. This is also where you can cancel the monthly rent when the tenant moves out.
To view upcoming transactions, navigate to Pre-Authorized Debit / Upcoming Transactions in the left navigation.
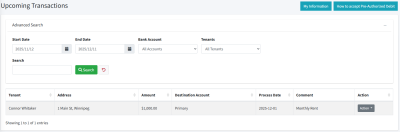
Here you can see all transactions scheduled. Change the end date to a few months into the future to see the rent being scheduled once per month.
If you need to schedule a one-time transaction (perhaps for a damage deposit or something else), on the Tenant Payments page, under the Action button, choose One Time Transactions. This page will allow you to schedule a single transaction.
Summary and Next Steps
In the previous sections, you have performed the following steps:
- Add a Property, Tenant, and Rental Agreement
- Signed up for PAD and have been approved
- Created your first monthly rent payment
After this, you can repeat the process of adding properties, tenants, and rental agreements for all additional units in your portfolio. We can also help you with this, as it can be a tedious process if you have a lot of units. Please reach out to us if that’s the case (e.g. you have more than 5 or 10 units).
You’ll also want to learn about running Tenant Verification Reports, which are background and credit checks for new prospects.
Please don’t hesitate to contact us if you have any questions or would like to schedule a meeting with your designated customer success representative. We’re here to make sure that you succeed.
Thank you,
The Streamline Landlord Service Team